Wednesday, December 14, 2011

Crocheted star pattern and tutorial...


I thought I would do a quick tutorial for those that are interested in whipping up a few of these stars in the lead-up to Christmas.


They are really simple and I have included step-by-step pictures to help if you are beginner at crochet.

Just a few things to start:  I am going to use UK crochet terminology, a 2.5ml crochet hook and baby cotton.  You can experiment with the yarn and hook size to get the look you're after.  My instructions are illustrated in the picture(s) above them.  The pattern is written below in full, without pictures, for those that like to work like that.

I give full acknowledgement of the base pattern to a rather ancient, out-of-print book given to me by my Grandmother many years ago, "Reader's Digest Complete Guide to Needlecraft".    If you ever see this book for sale in a second hand store, grab it.  It's my needlecraft Bible.

Step one:


Chain 2

Step two:


5 dc in 2nd chain from hook

Step three:


3 dc in each dc (you will now have 15 "chains" around the circle).

Step four:
Now begin to form the 5 points of the star.


1 dc in next stitch


ch6


sl st in 2nd chain from hook, 1 dc in next ch, 1 htr in next ch, 1 tr in next ch, 1 dbl tr in next ch, 1 dbl tr in base of starting dc


sk 2


dc

Repeat step four a further 4 times to create five points

Step five:


Sl st in first dc to join, fasten off, leaving a 20cm tail if you wish to create a loop for hanging.  Weave in ends on the reverse.

Step six:

Blocking:
These stars benefit from a little blocking and starching to remain flat, as they are prone to curling up at the points.

Lay out the stars on a surface like your ironing board covered in some paper towel or an old tea towel.

Pin the corners with the pins on an angle pointing in towards the centre of the stars.

Give a blast of spray starch and leave to dry overnight.  If you are in a real rush you can spray the stars with starch and then iron them.  They will go flat, but won't necessarily have the best shape that they might have with blocking.

Use as desired.  Eight of these packaged in a nice cellophane bag makes a lovely gift.  You can embellish them with sequins, beads or buttons, or applique one to a winter hat, scarf or mittens.

If you don't know how to crochet, it is relatively easy to teach yourself using tutorials on youtube.

-------


Crocheted Star Pattern (UK terminology)

Ch 2
Round 1:  5 dc in 2nd ch from hook
Round 2:  3 dc in each dc
Round 3:  (1 dc in next st, ch 6, sl st in 2nd ch from hook, 1 dc in next ch, 1 htr in next ch, 1 tr in next ch, 1 dbl tr in next ch, 1 dbl tr in base of starting dc, sk 2, dc) Repeat 4 more times
sl st in first dc to join, fasten off.
Tuesday, December 6, 2011

Making Christmas, special...


A strange little mish-mash of things in today's post.  I thought I'd just share a few of the things that I've been making and baking in the lead-up to Christmas, and I'd like to invite fellow bloggers to link up to this post below (in the comments section) to show myself and other readers what you've been making and baking too!


I tried a new recipe for gingerbread and made these trees.  All you need is a good gingerbread recipe and a nesting stack of star cutters - mine had 10 layers.  Bake the cookies and then sandwich them together with a generous dollop of royal icing in between each layer, checking to see if the tree is straight as you go.  Ice and decorate as desired with sprinkles etc.   They make great presents as the receiver can enjoy it as a table centerpiece, or with a cup of tea.


And speaking of gingerbread, I made a gingerbread house for the kids to decorate.  They had a lot of fun and made a lot of mess.  This year I saved myself a bit of time and purchased one of these to cut all the pieces out instead of using paper templates.


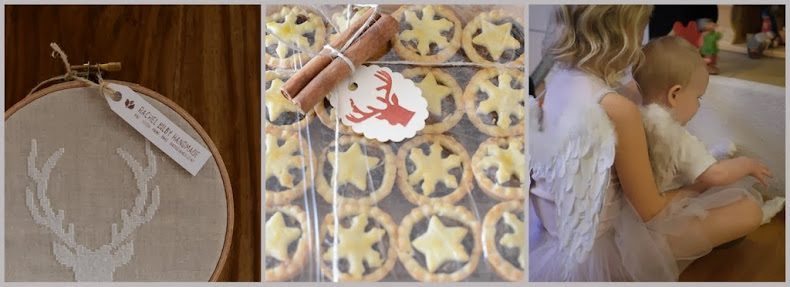
I made copious amounts of Christmas mince tarts (recipe here).  I have a lot of British friends here in Switzerland so the tarts always go down well as you can't find them in the supermarkets for love or money.


I knitted this merino hat and mittens for a friend's baby girl using this pattern.  I lined the mittens with jersey cotton so they are extra soft and warm on her little hands.  I can't wait until after Christmas and I can start on a set for my new baby.


I was especially pleased with how the embroidered tag came out.  I used a cursive font alphabet pattern I had already, and then free-stitched the ball of wool and needles, zig-zagging it on the machine and fraying it to finish.


This lavender laundry spray is such a great gift and so easy to make.  It is made from essential oil, vodka and filtered water, recipe and instructions, here.  Bottles from Ikea.


This spice wreath made out of cinnamon sticks and star anise was surprisingly simple.  I just drew a wide ring on an old piece of cardboard and got out the glue gun and started arranging the sticks within the ring, (using the template below as a guide, but not actually sticking the sticks to it).  The whole thing took me less than thirty minutes to make.  A bit of gingham ribbon or raffia threaded through one end would mean you could hang it on the door too.  This picture doesn't show how good it smells :).


I made these gift-tags for all my handmade presents which will be given out to friends here, and a set of 24 for the runner-up prize for my giveaway.


These crocheted stars will be on all the gifts I give in New Zealand.

Wow, when I look at it like that, I have been busy!  Can't wait to get on the plane home.  Less than two weeks to go, and my to-do list keeps expanding.

If you are a blogger, please feel free to post a link in the comments below and show me what you've been making for Christmas this year, I'd love to check it out.

Frohe Weihnachten!

Monday, December 5, 2011

And the winner is.... (and a runner-up prize too)...

The prize pack...

Thanks for all the entries into my Handmade Christmas Giveaway!  I loved reading about all your Christmas wishes - as varied as they were beautiful.


So, without further ado, here are the results.  Miss S allowed me to interrupt her painting long enough to draw the lucky winner(s) from the hat, or bowl in this case.  It's a little more fun than random.org. :)


Congratulations, Meghan!  I will be in touch with you shortly and will be sending the prize-pack off ASAP.  Your comment was:

"I'm wishing for this giveaway! j/k ok no I'm not, you are so talented. And congrats on 100 posts!!! I've been wishing for plane tickets to Zurich from Santa, know anyone that could put a word in for me? ;)"

Glad that I could actually make that wish come true, well, half of it at least.


But the fun doesn't end there, oh no.  I got a little bit extra crafty, and I made this set of 24 gift tags as a runner-up prize.  And these will be winging their way to....


Congratulations, Jane.  Your comment was:

"Good health! Last Christmas was a diaster as I got sick before Christmas, went to the Dr then had a reaction to the drugs! The whole thing was a blur and I was so disappointed. It has to be better this year!!"


I really hope your wish comes true, and that Christmas is so good this year that it makes up for some of the fun you missed out on last year.

My Christmas wish is a little selfish.  I am hoping for safe and happy travels for our little family as the four of us head to New Zealand.  It is 30 hours of travel with two 12 hour flights back-to-back.  I am just hoping that none of us get sick before the journey and that we don't annoy the other travelers around us too much!

I have a "Christmas creativity round-up" coming up soon and an opportunity for fellow crafting bloggers to link to what they've been up to and show the world.  I'm really looking forward to that!

LM x

Related Posts with Thumbnails